¶ Overview
In the Voice of Norway's application, routes are a fundamental component that companies can create to provide their customers with a seamless and engaging experience. Each route belongs to a particular company and comprises multiple points of interest.
Routes are accompanied by cover images and descriptive text, which can be translated into multiple languages for broader accessibility. Users can favourite routes and leave reviews, providing valuable feedback for future iterations.
To ensure that users can access routes regardless of internet connectivity, routes are available for download and stored in the mobile cache for offline usage. This functionality is particularly useful for travellers on boats or trains, who may not have consistent access to mobile data coverage.
Overall, the use of routes provides a structured and intuitive approach to exploring new locations, while also providing valuable information and insights to users. The ability to download routes for offline usage enhances the application's convenience and accessibility for travellers on the move.

- New: Users can create new routes using this feature.
- Export: Users can export their routes to a different file format or service.
- Delete: Users can select and delete one or more routes using this feature.
- Search: Users can use the search bar to find specific routes.

In the Routes section, the platform displays the following columns:
- ID: The unique identifier of the route.
- Status: The current status of the route (e.g., published, draft, deactivated).
- Name: The name or title of the route.
- Type: The type of the route.
- Updated: The date and time of the last update to the route.
- Hidden: An indicator to show if the route is hidden or not.
These columns provide important information about each route, including its identifier, status, name, type, last update, and visibility status.
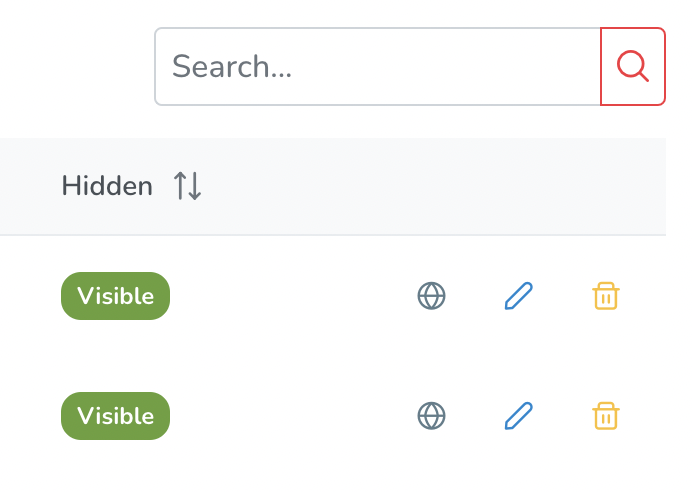
Under the list of created routes, each route is accompanied by the following indicators/buttons:
- Languages indicator: When hovering over this indicator, it displays the languages available for the route.
- Edit button: Clicking on this button allows users to edit the details and settings of the route.
- Delete button: Clicking on this button removes the route permanently from the platform.
These indicators/buttons provide convenient options for managing the created routes, such as accessing language information, making edits, and deleting routes when necessary.
¶ BASIC INFO
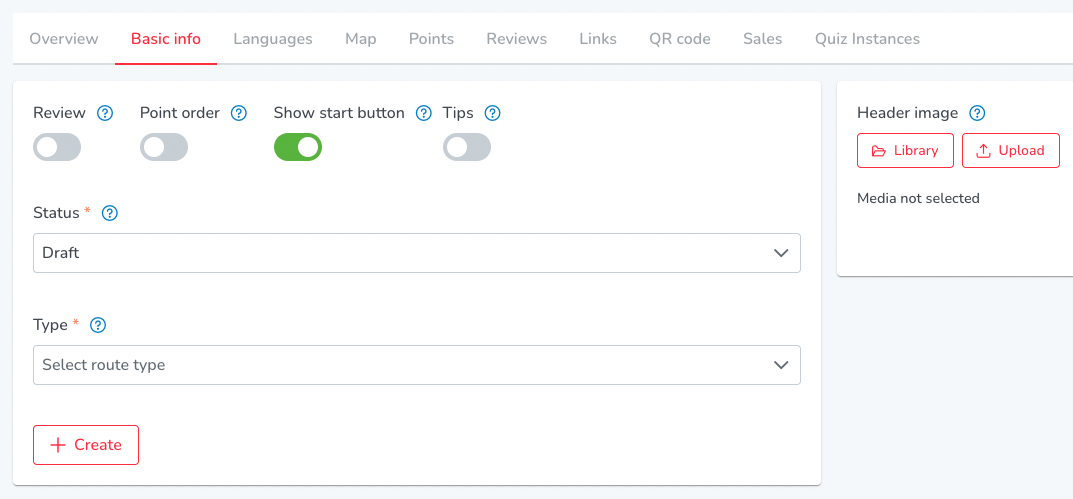
When creating new points, users have several options available:
- Review: Users can enable this option to allow other users to leave public reviews and comments on the routes.
- Point Order: Users can specify the order in which points should be visited in the route. This is indicated by numbers displayed when viewing the route in auto/map view. Points can be easily reordered in the Points tab.
- Show Start Button: Users have the choice to show or hide the start button on the Route screen in the mobile app. When the start button is visible, users can switch to Map mode where only the selected route is displayed. This feature is commonly used for outdoor routes.
- Tips: Allow users to leave a tip when visiting the route page in the mobile app.
Regarding the status of the route:
- Published: Routes with this status are visible in both the Publisher and mobile app for users to access.
- Draft: Newly created routes that are visible only in the Publisher. They are not yet available to users in the mobile app.
- Deactivated: Routes with this status are only visible in the Publisher and not accessible to users in the mobile app.
Users can also assign a type or category to their routes, specifying the classification to which the route belongs.
Additionally, users have the following options for managing the route's header image:
- Select from Library: Users can access a media library to choose an existing image as the route's cover image.
- Upload: Users can upload image files from their device or other sources like Google Drive, Dropbox, and Unsplash. The drag and drop function can also be utilized for this purpose.
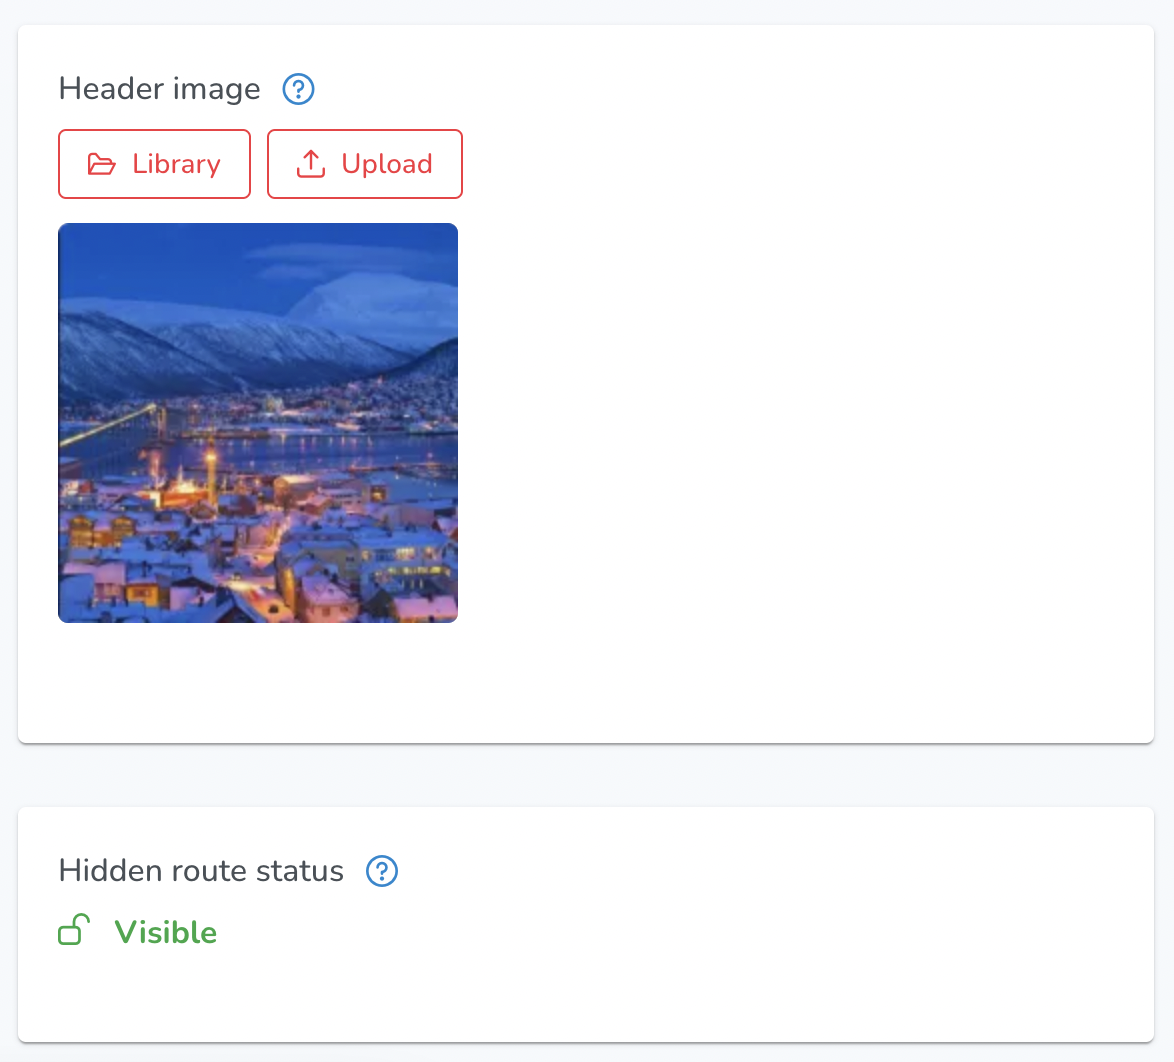
Already created routes have ‘Header image’ section where users can customize the visual representation of their routes. Within this section, users have the following options:
- Upload: Users can upload their own custom header image to be used for the route. This allows for personalized branding and visual representation.
- Choose from Library: Users can select a pre-existing image from a library of available options. This library may include a variety of images that are suitable for different themes or purposes.
Also, there is a hidden point status indicator below.
Routes are hidden if they are either sellable or have links with expiry dates and/or maximum usages.

Point Order on mobile app:
- When Point Order is enabled in the Route settings, it ensures that points play in a specified sequence. This means that a point will automatically play when a user enters its geofence, but only if it is the next point in the sequence

- Once a point has been played, its geofence color on the map will lighten, indicating that it has been triggered. This point will not be automatically triggered again for the next 12 hours, preventing re-triggering if the route is circled.
- Users can manually trigger the audio guide by tapping on a point on the map.
- Users can reset the played points on the Route Details screen by checking the "Reset played ordered Points" checkbox and then tapping the “Start” button.

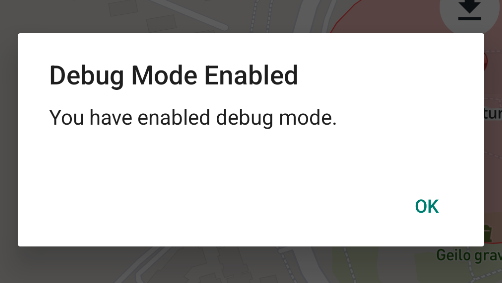
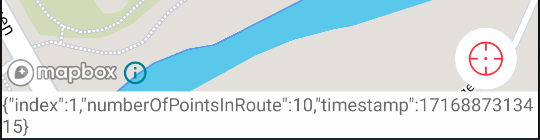
- Debug mode can be enabled by tapping the "Focus User Location" icon five times in succession. If a point has been played, it will be displayed at the bottom of the map. To disable debug mode, tap the icon five times again or navigate back to the Route Details screen.
¶ OVERVIEW
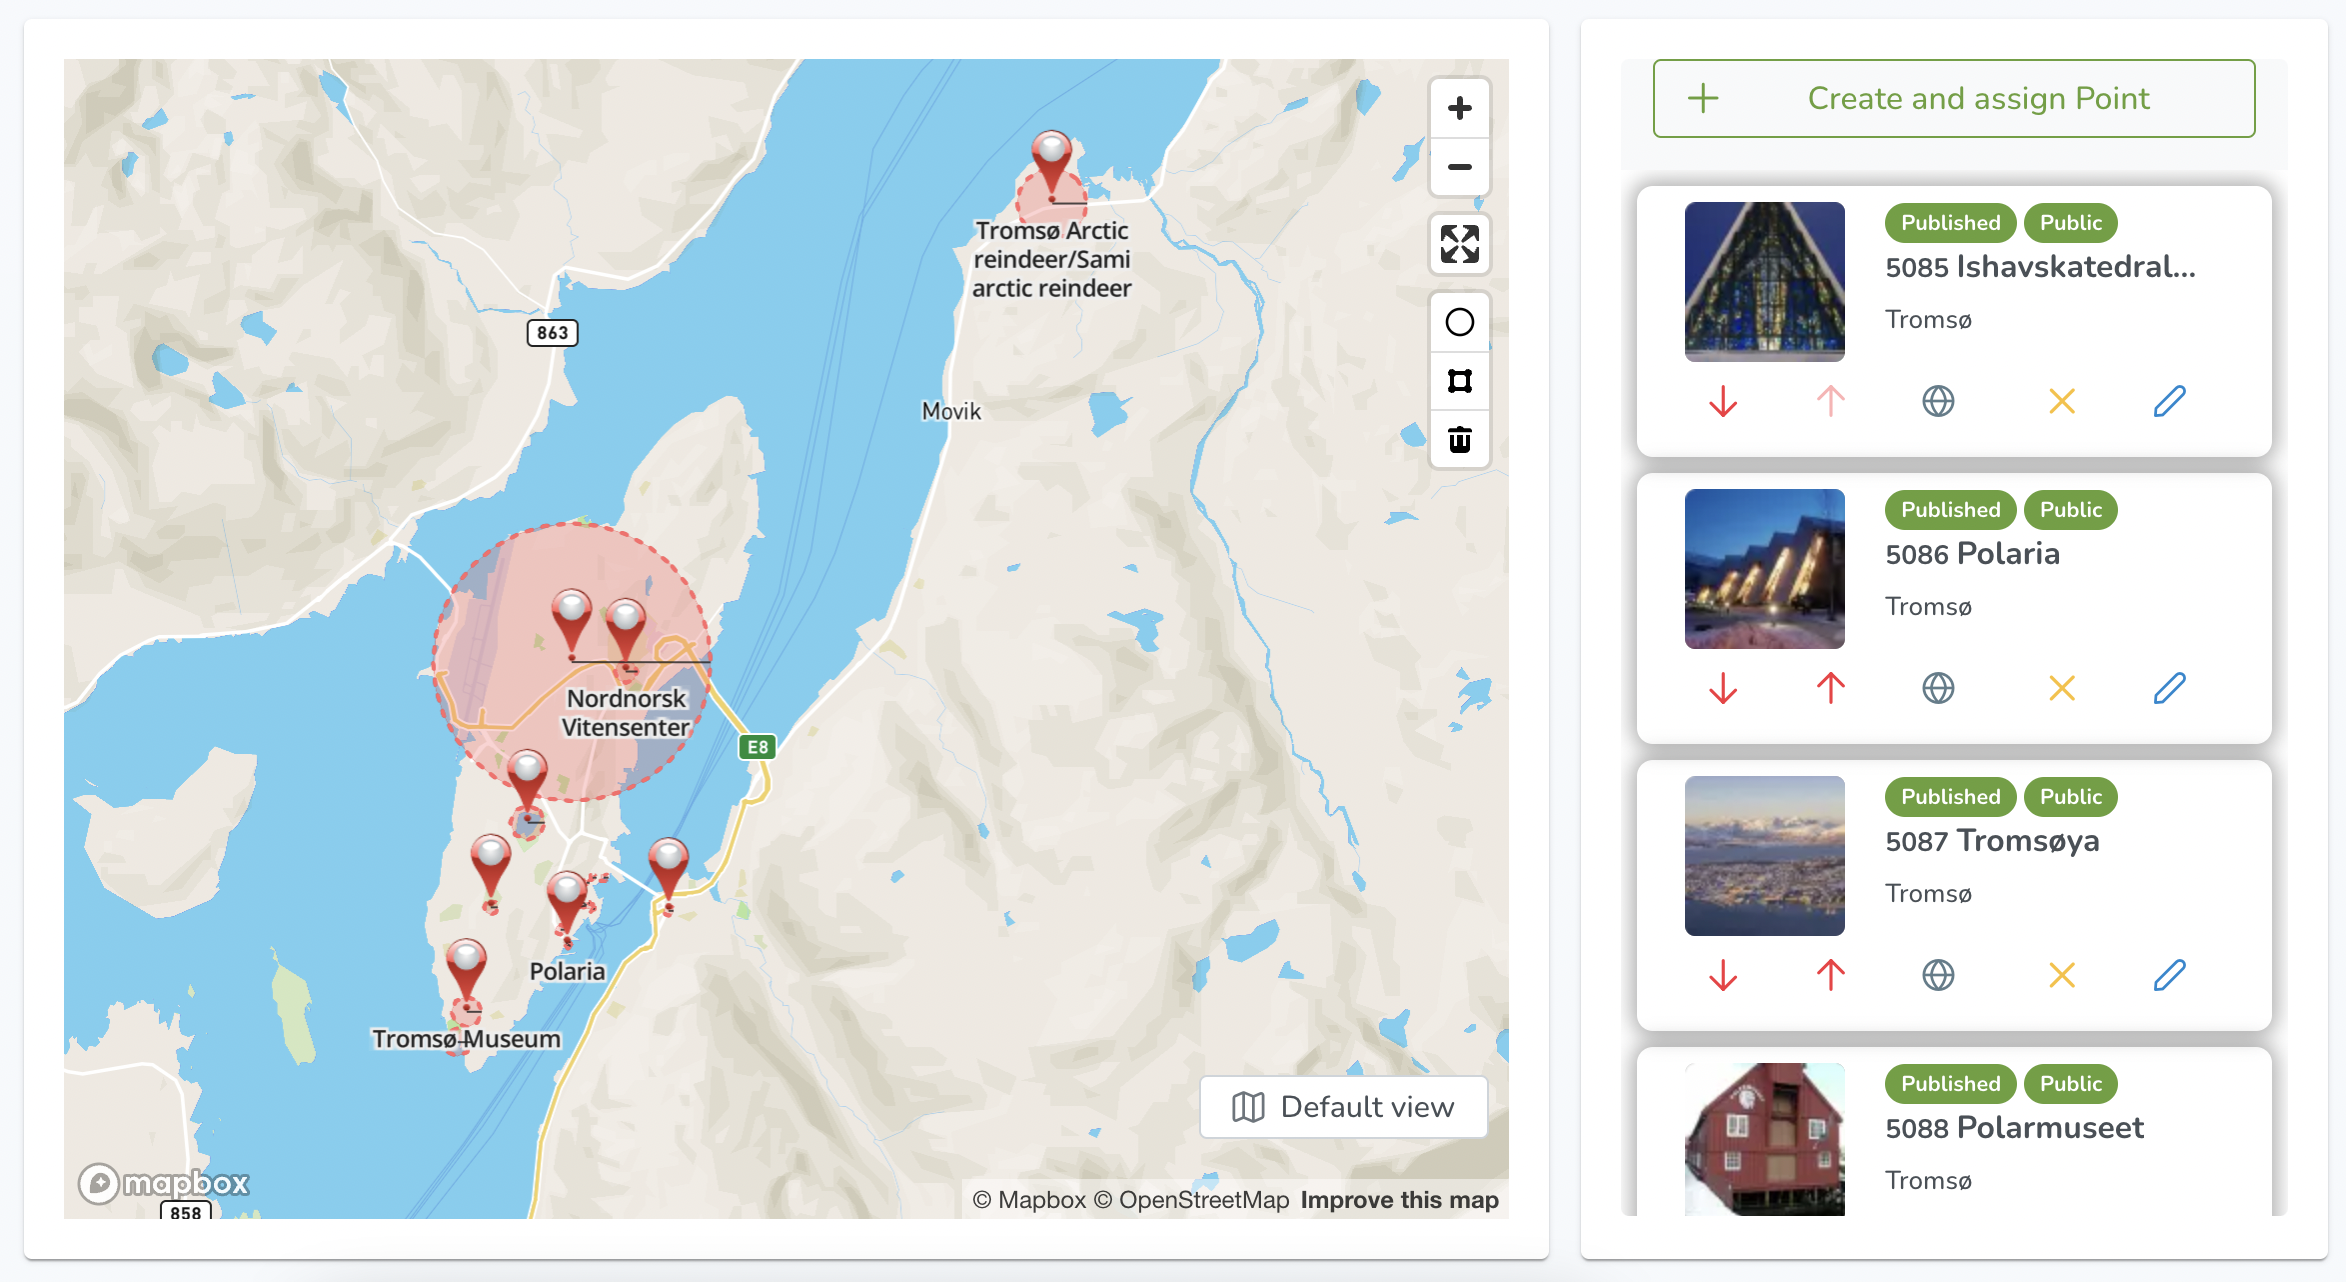
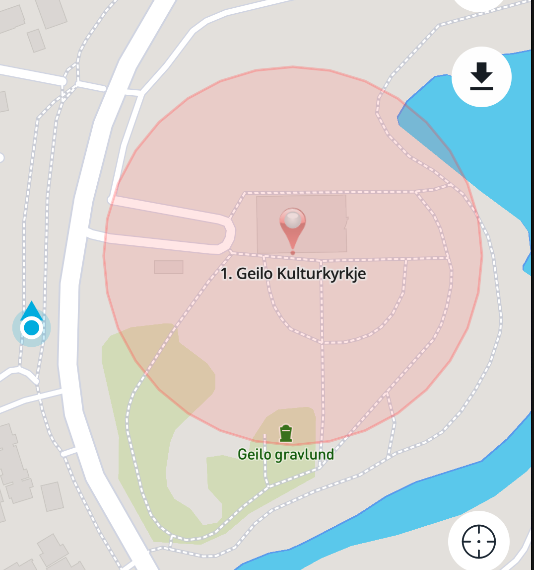
On the Overview section of the Routes page, users are presented with a map view showing all the points within that route. The map view has typical features such as zoom in, zoom out, enter fullscreen, circle tool, polygon tool, and delete.
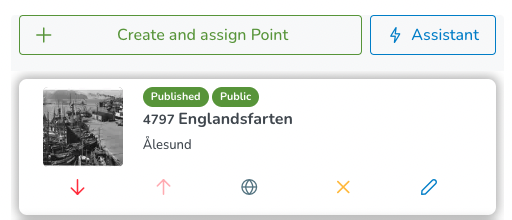
Next to the map is a column listing all the points, with options to create and assign new points at the top of the column. Each point is labeled with an indicator for its privacy setting (public or hidden) and status (published, draft, deactivated). The column also displays a picture/cover image for each point and offers options to edit the point's languages, remove the point, and edit the point. Users can also use the arrows to move points up and down and reschedule their order.
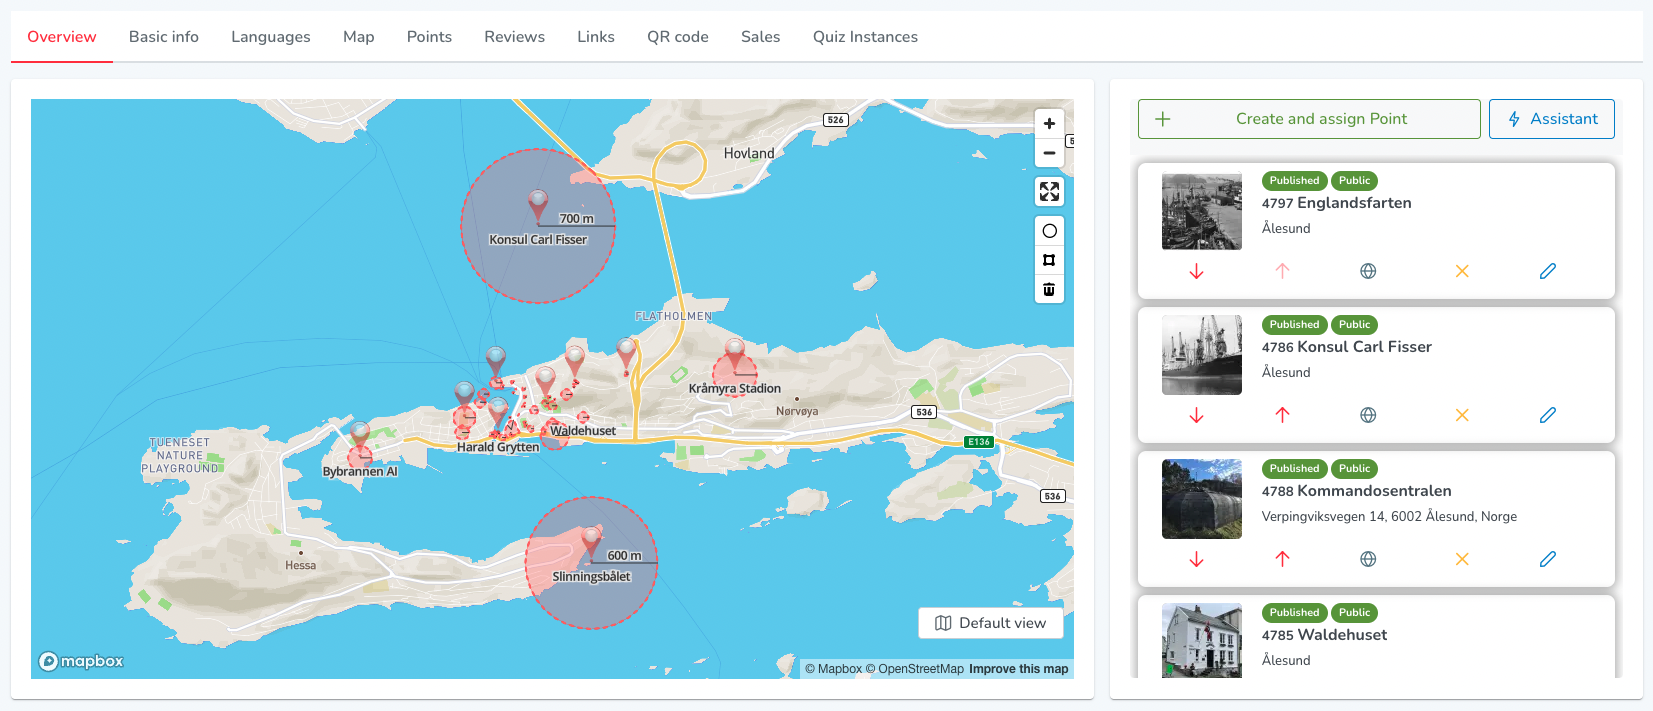
In addition to the content admin view, super admin users are also presented with the AI assistant.
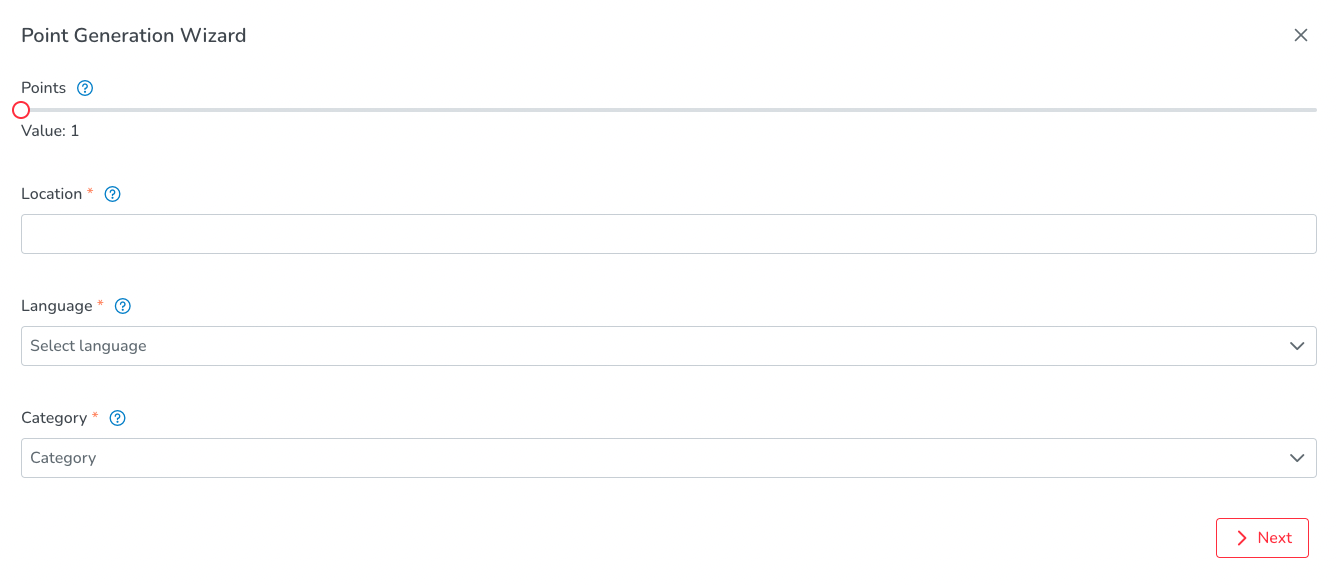
When users open the AI assistant, they are presented with the following options:
- Points: How many points would you like the AI to generate for you?
- Location: Which specific location do you want the generated points to be related to?
- Language: Select the language in which you want the content to be generated.
- Category: Choose the desired category for the generated content.
¶ LANGUAGES

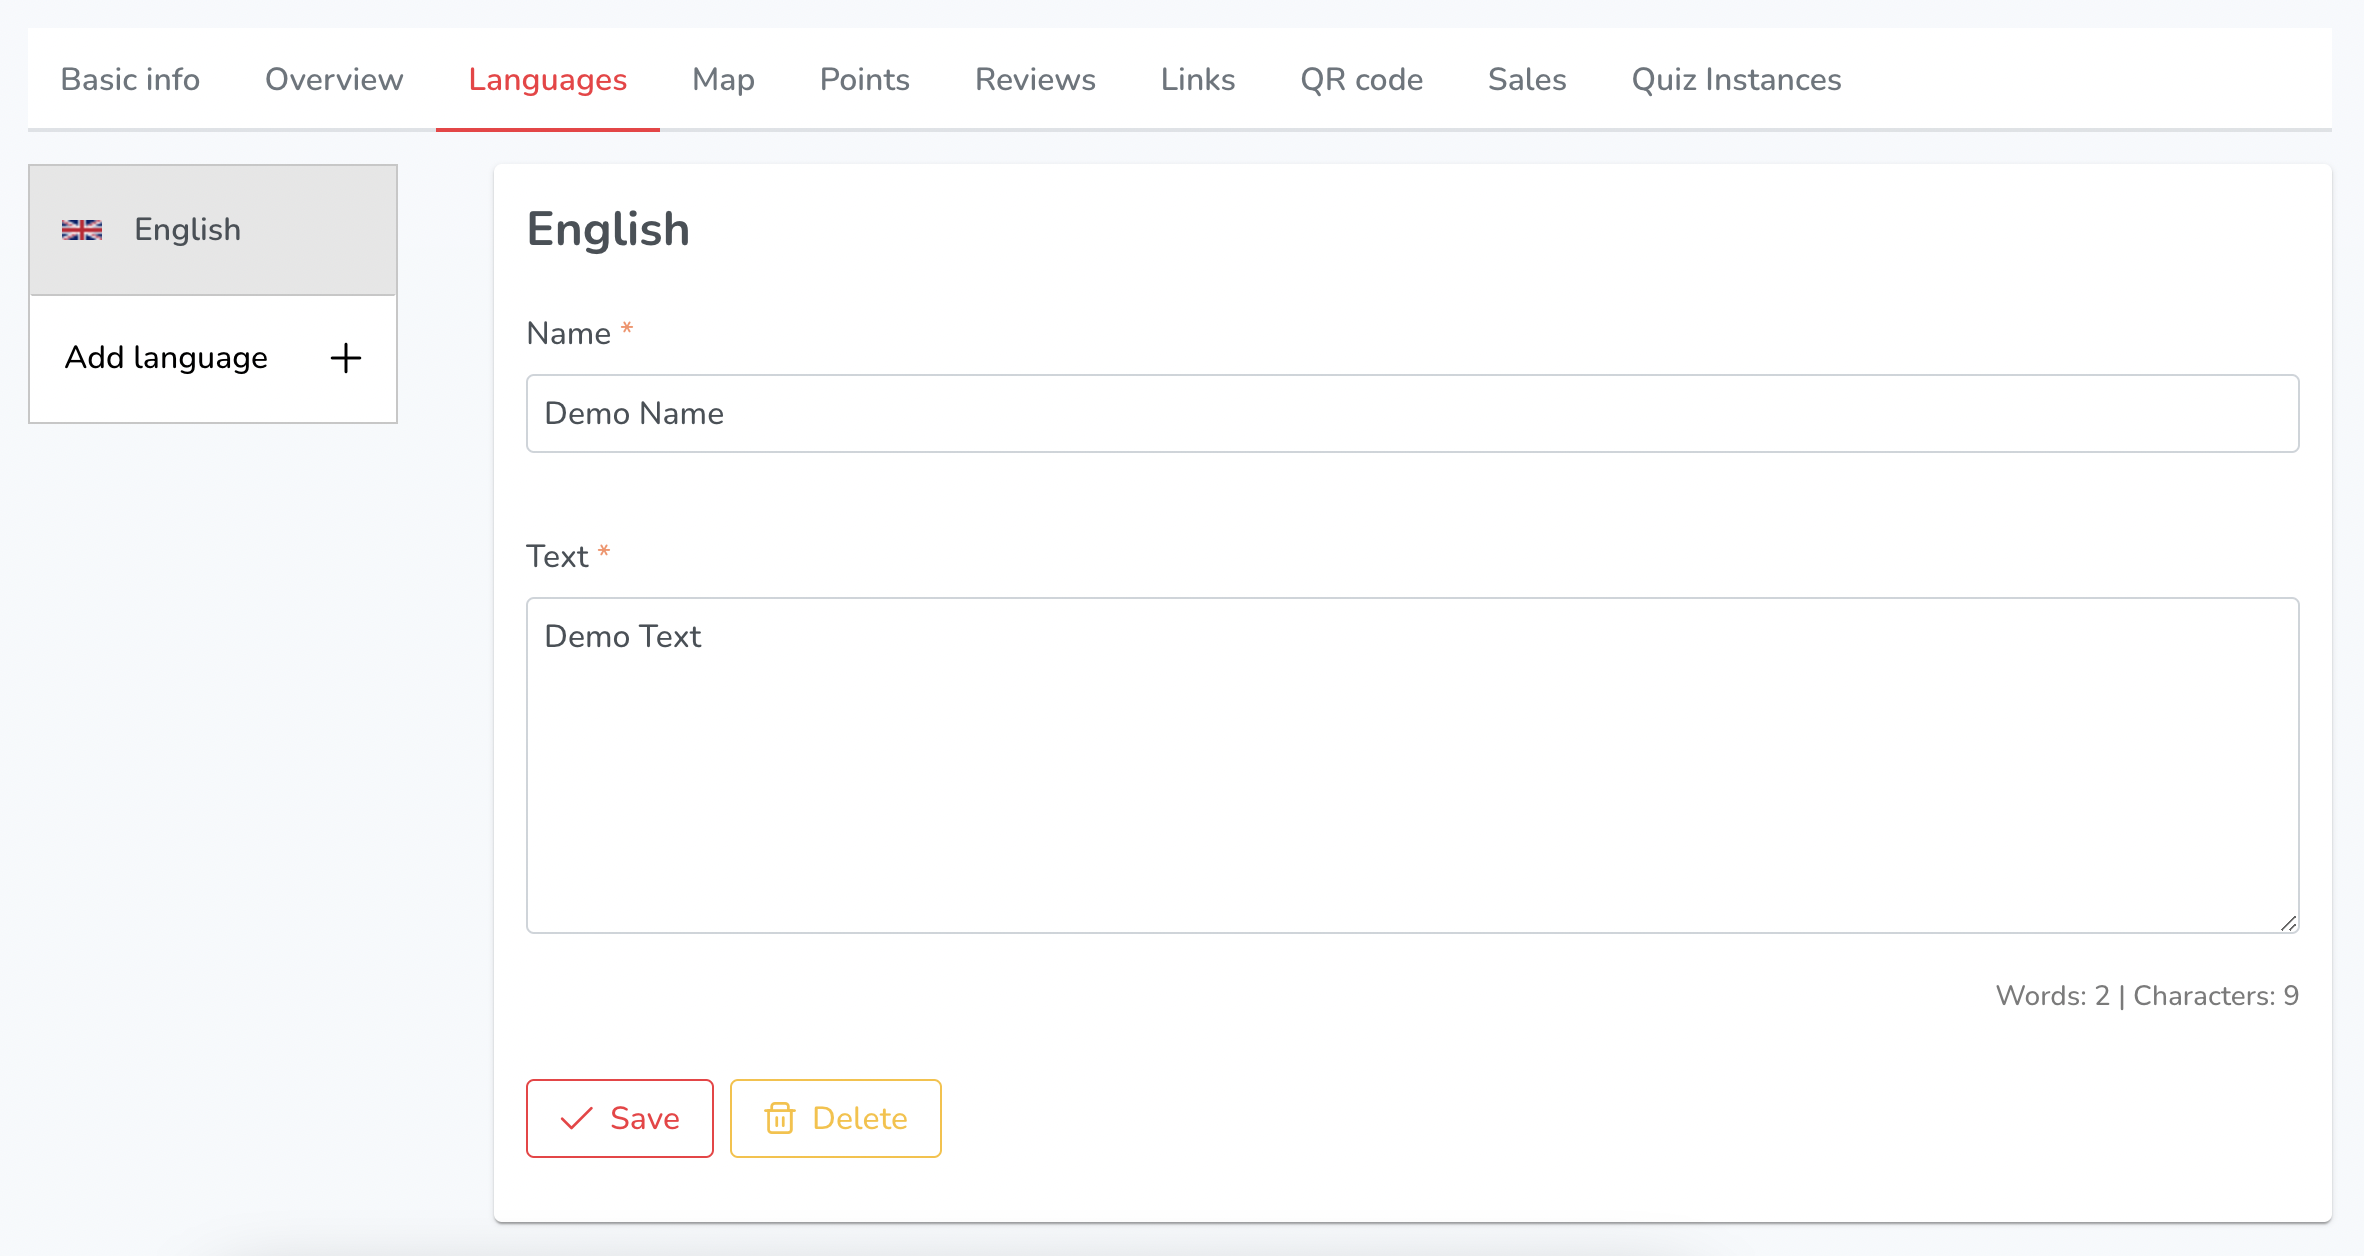
Add Language: Once a route is created, users will be prompted to add a language to begin filling in the details and description of the route.
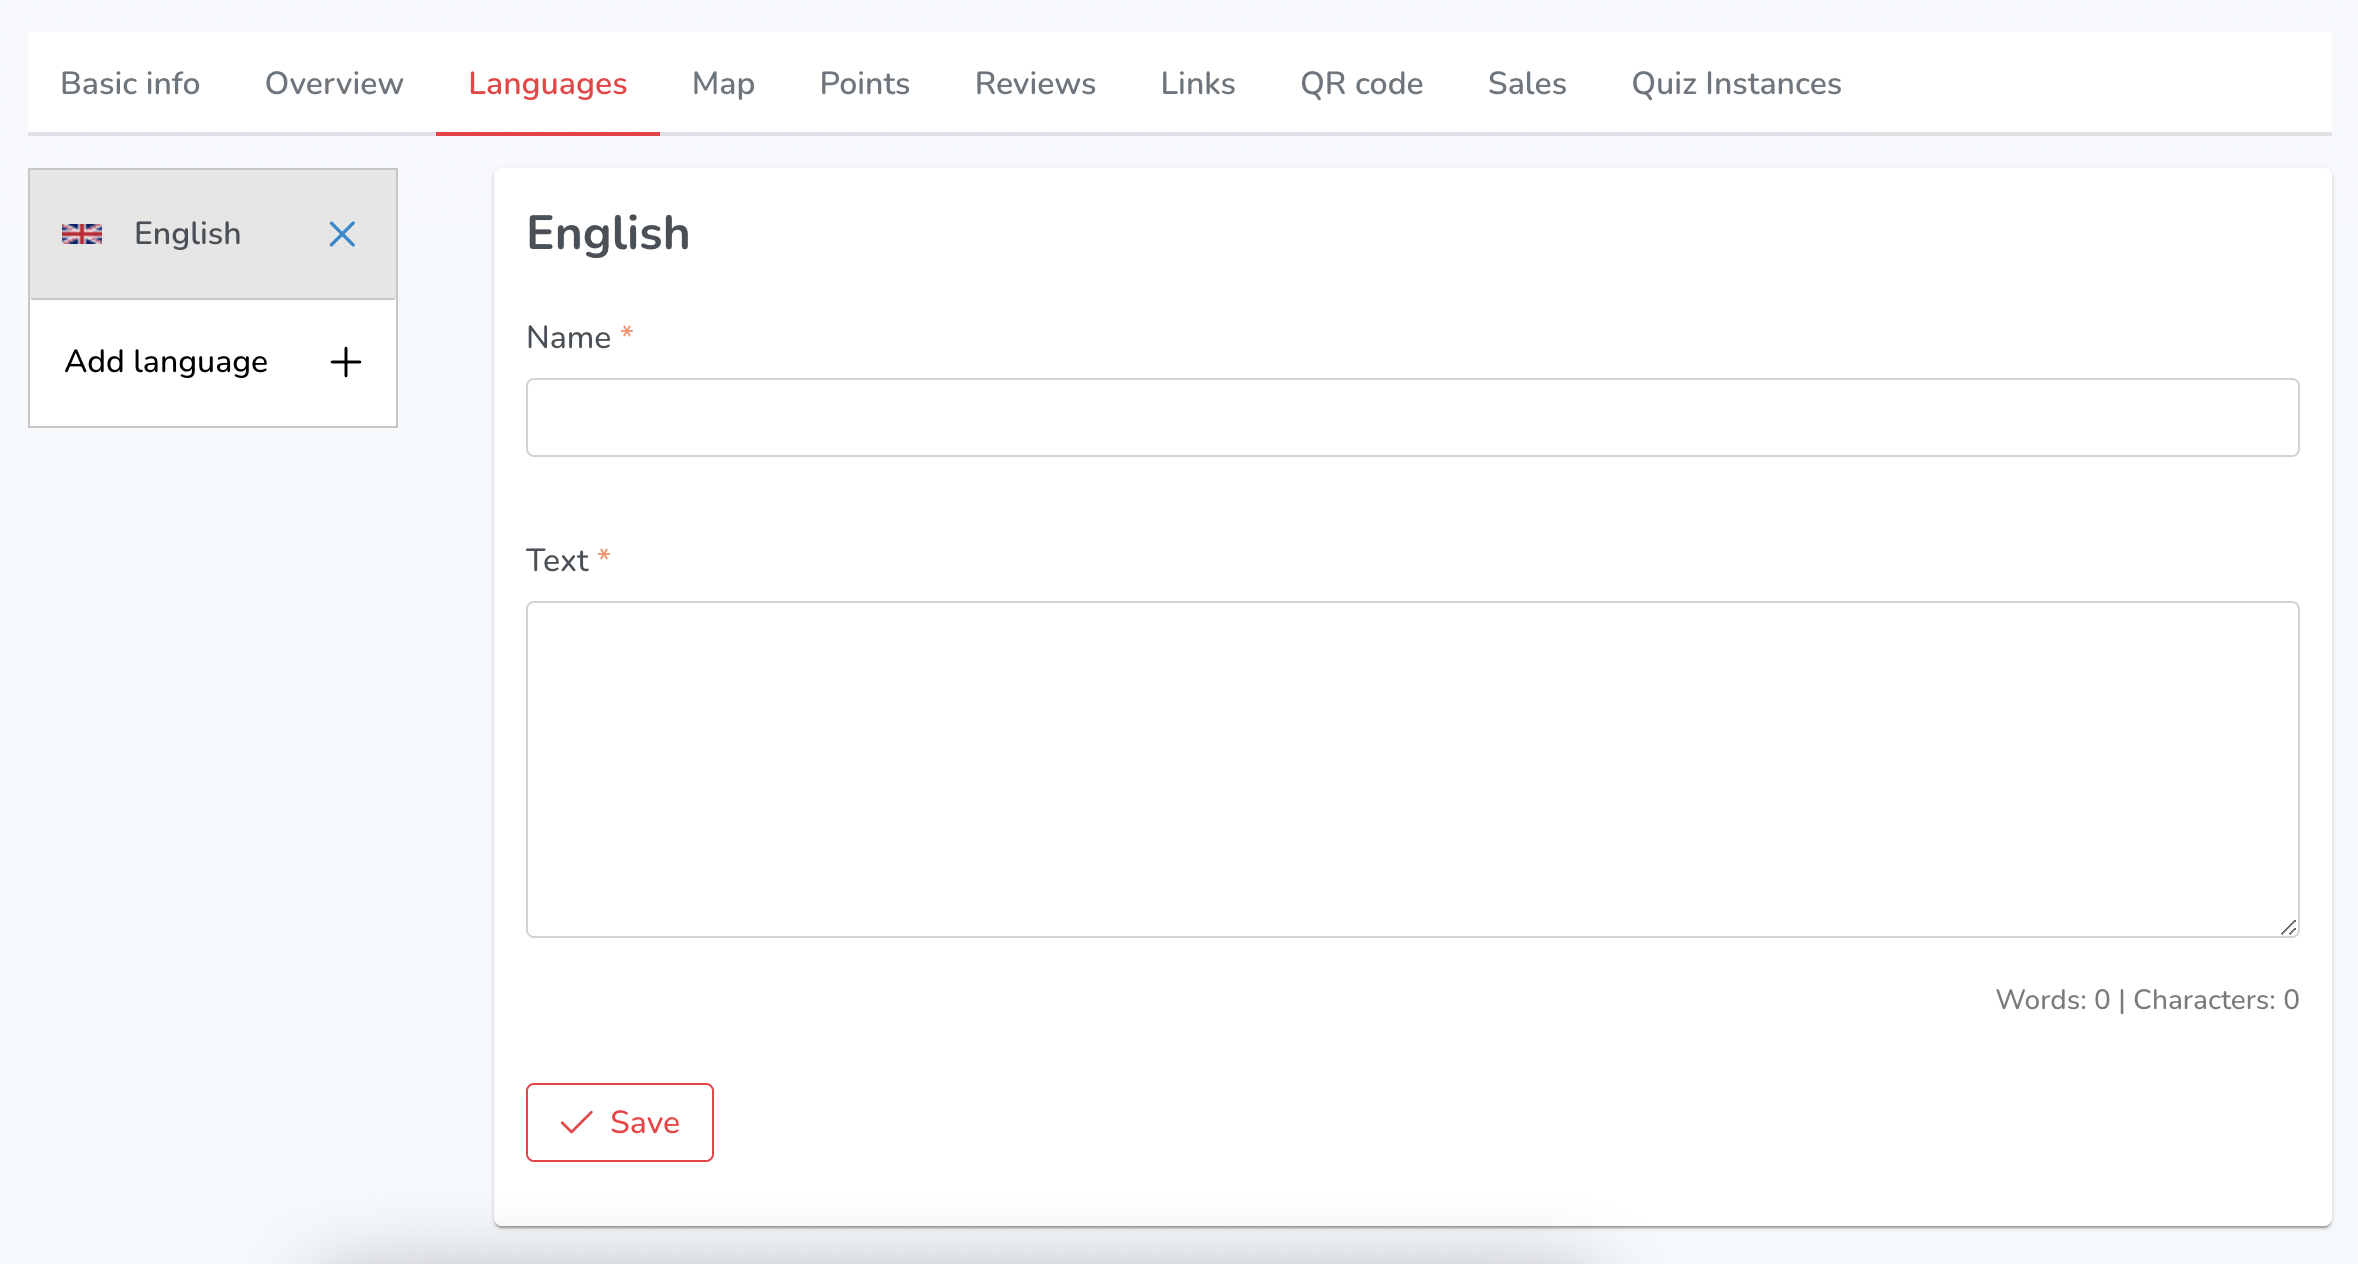
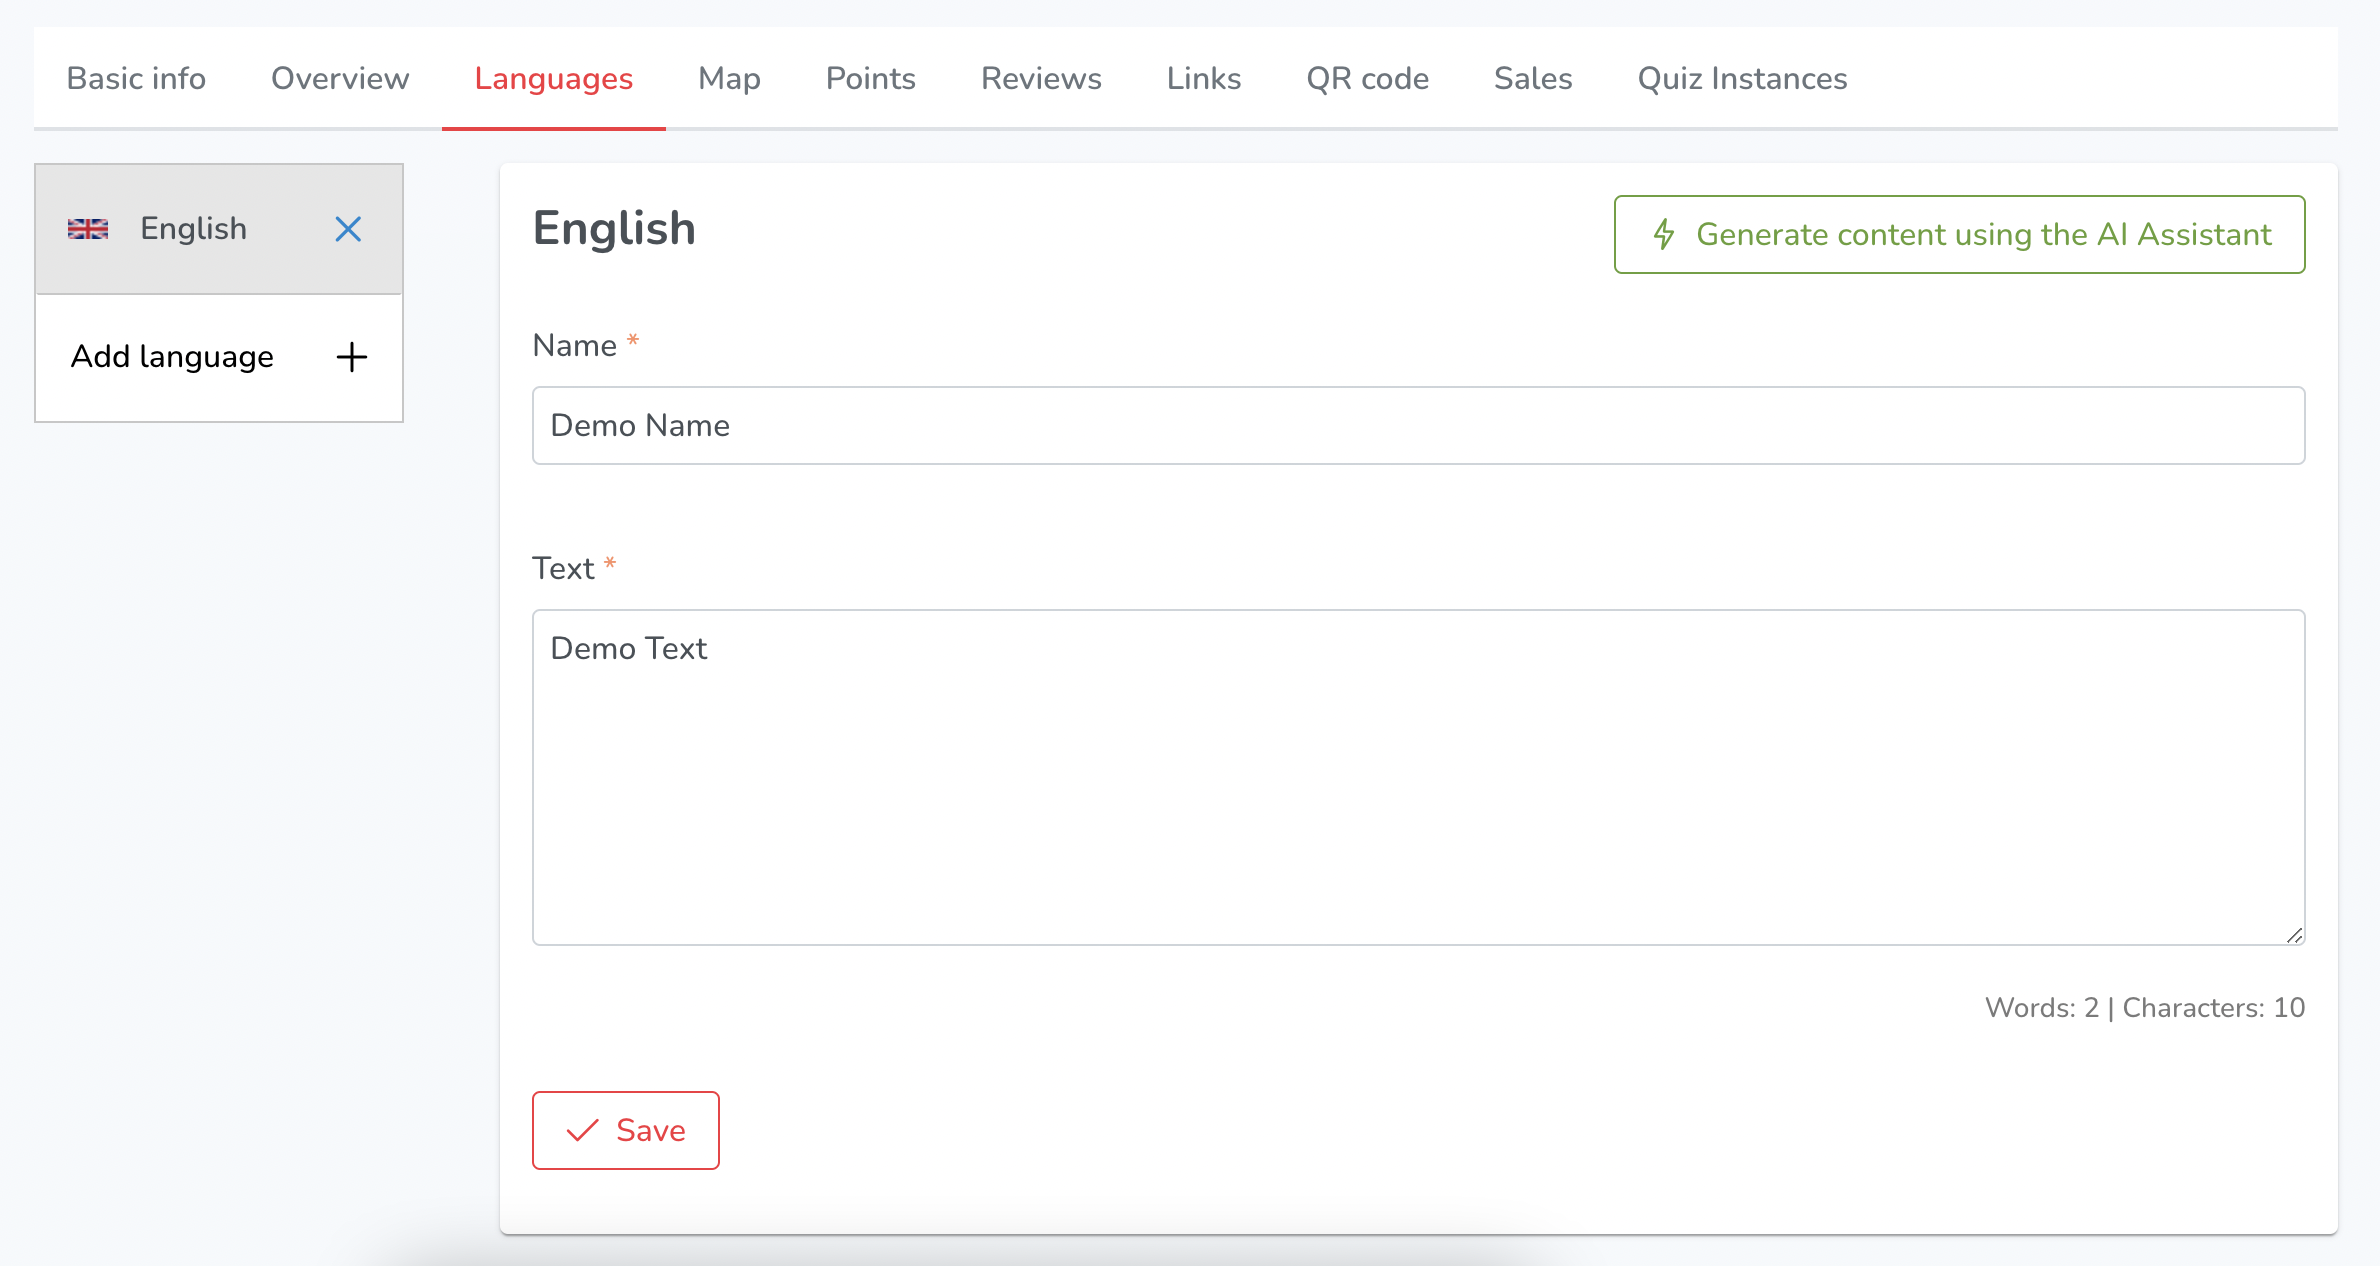
The Languages section allows users to add and manage descriptive text in different languages for their content. It includes the following features:
- Name: Users can enter the name of their content for each language they want to add
- Text: Users can enter descriptive text for their content in each language they want to add.
- Save: Users can save changes made to the name and descriptive text.
- Word Count/Character Count: The section displays the word count and character count for the descriptive text entered by the user.
- Add (Another) Language: Users can add another language by clicking on the "Add Language" button. This allows them to enter the name and descriptive text for their content in a new language.
- Delete: Users can delete a language by clicking on the "Delete" button.
- AI Assistant (Super Admin): Super Admins have the option to generate descriptive text using an AI Assistant.
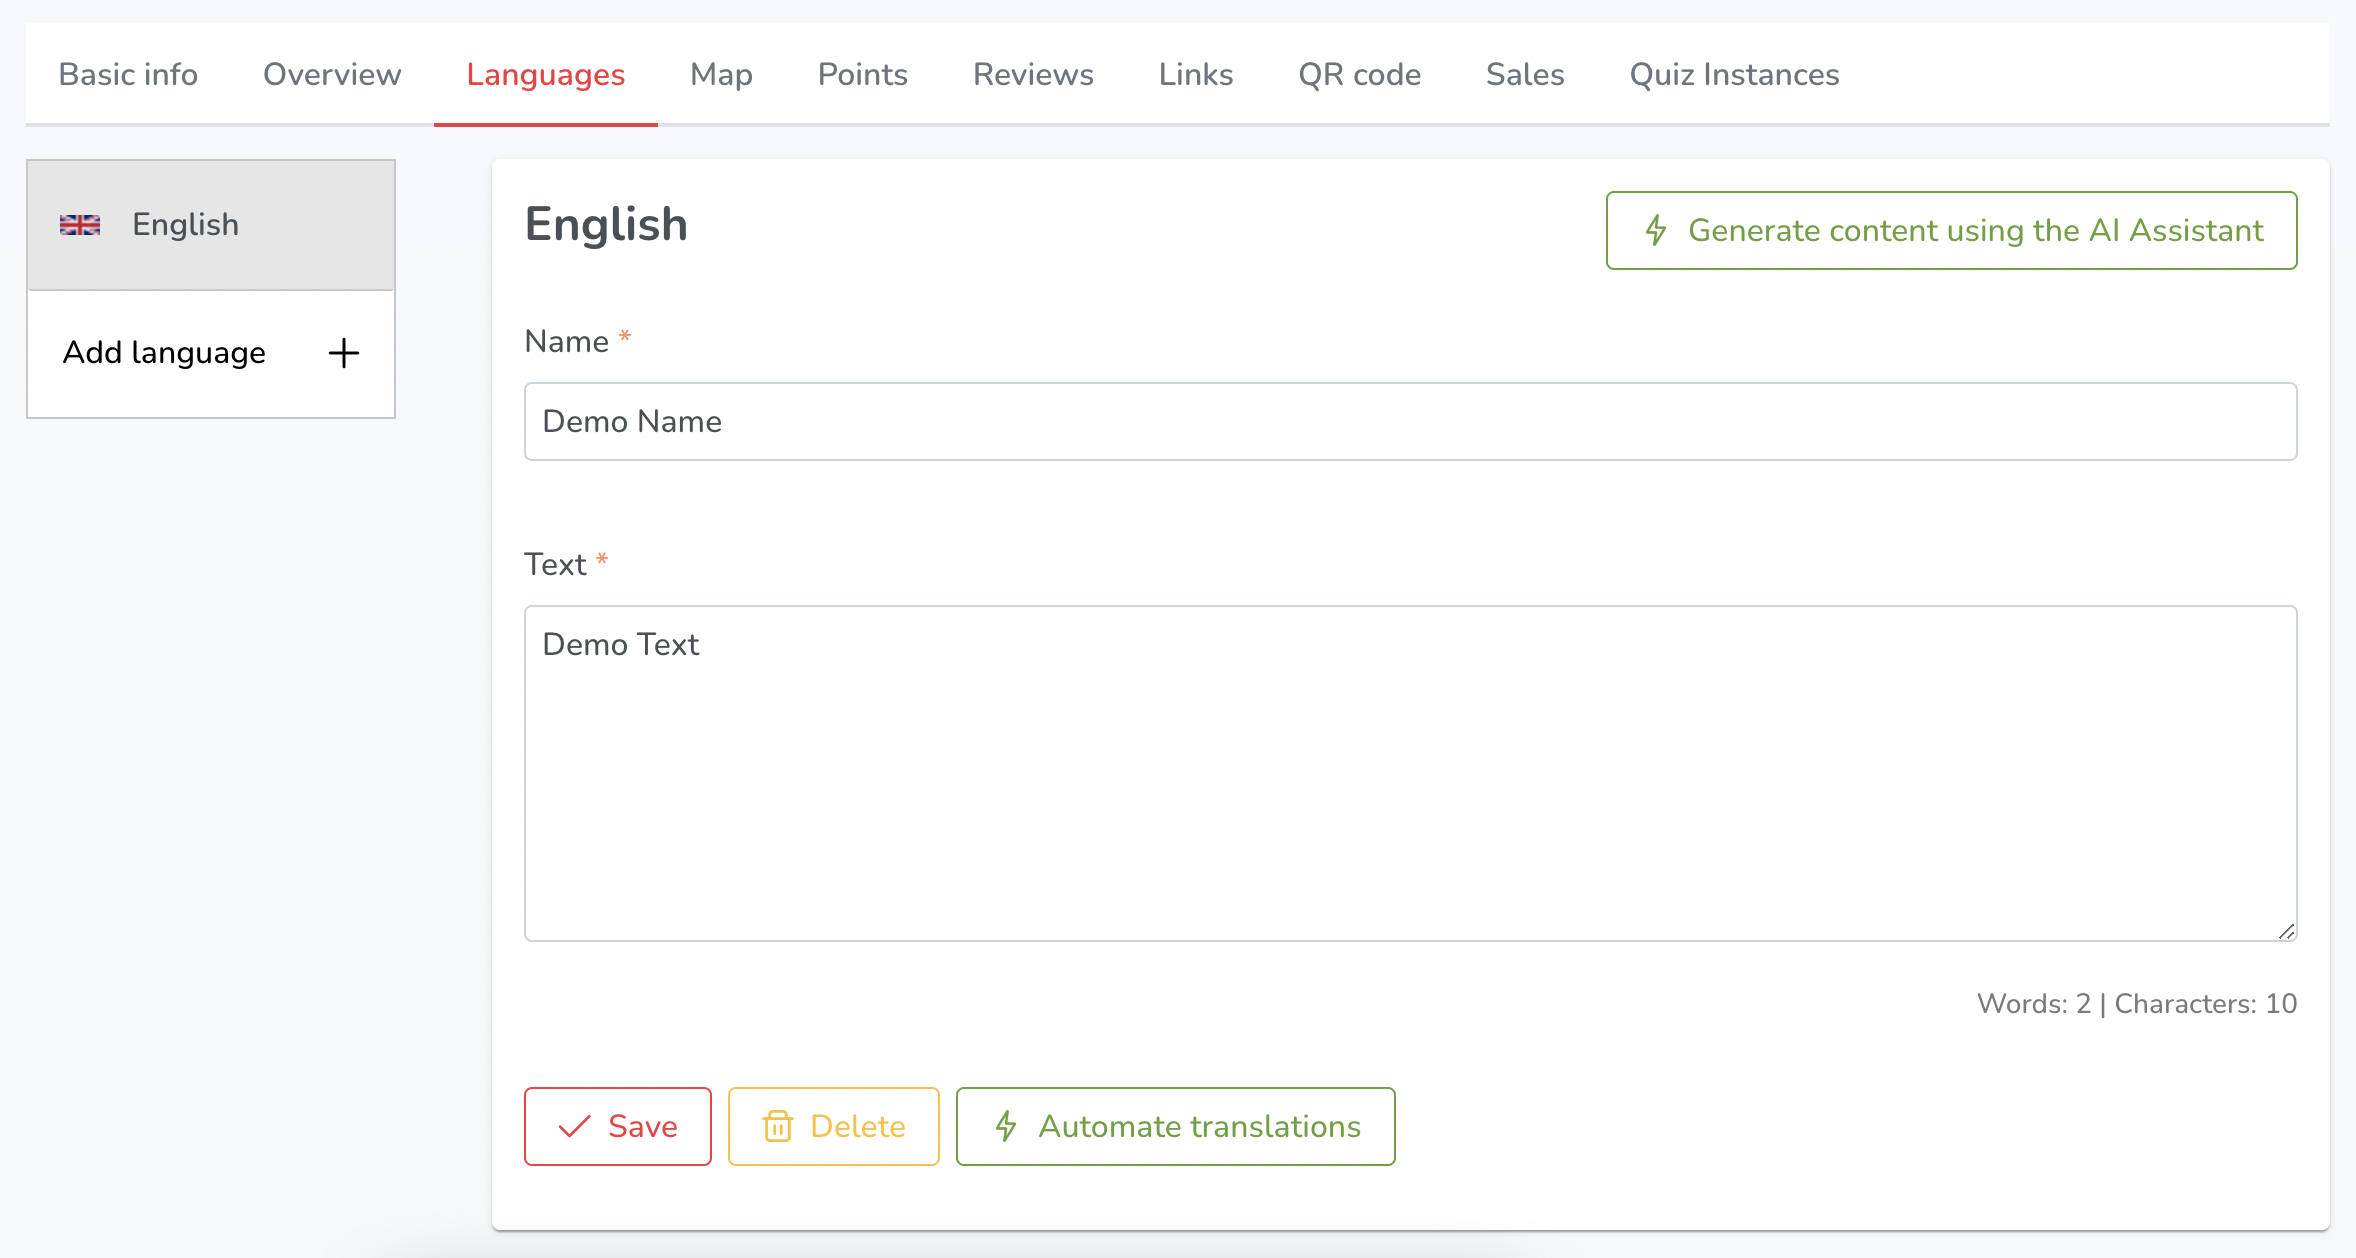
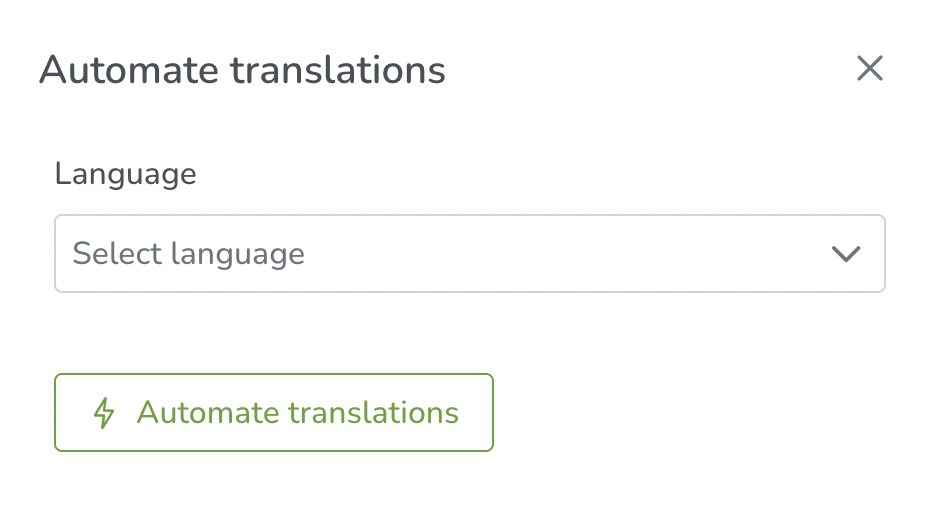
In the super admin view, there is an AI "Automate Translations" button available. This button allows super admins to select multiple languages and automate the translation process for all of them.
Additionally, there is an option to enable the "Generate Audio Files" button, which generates audio files based on the translated text.
¶ MAP

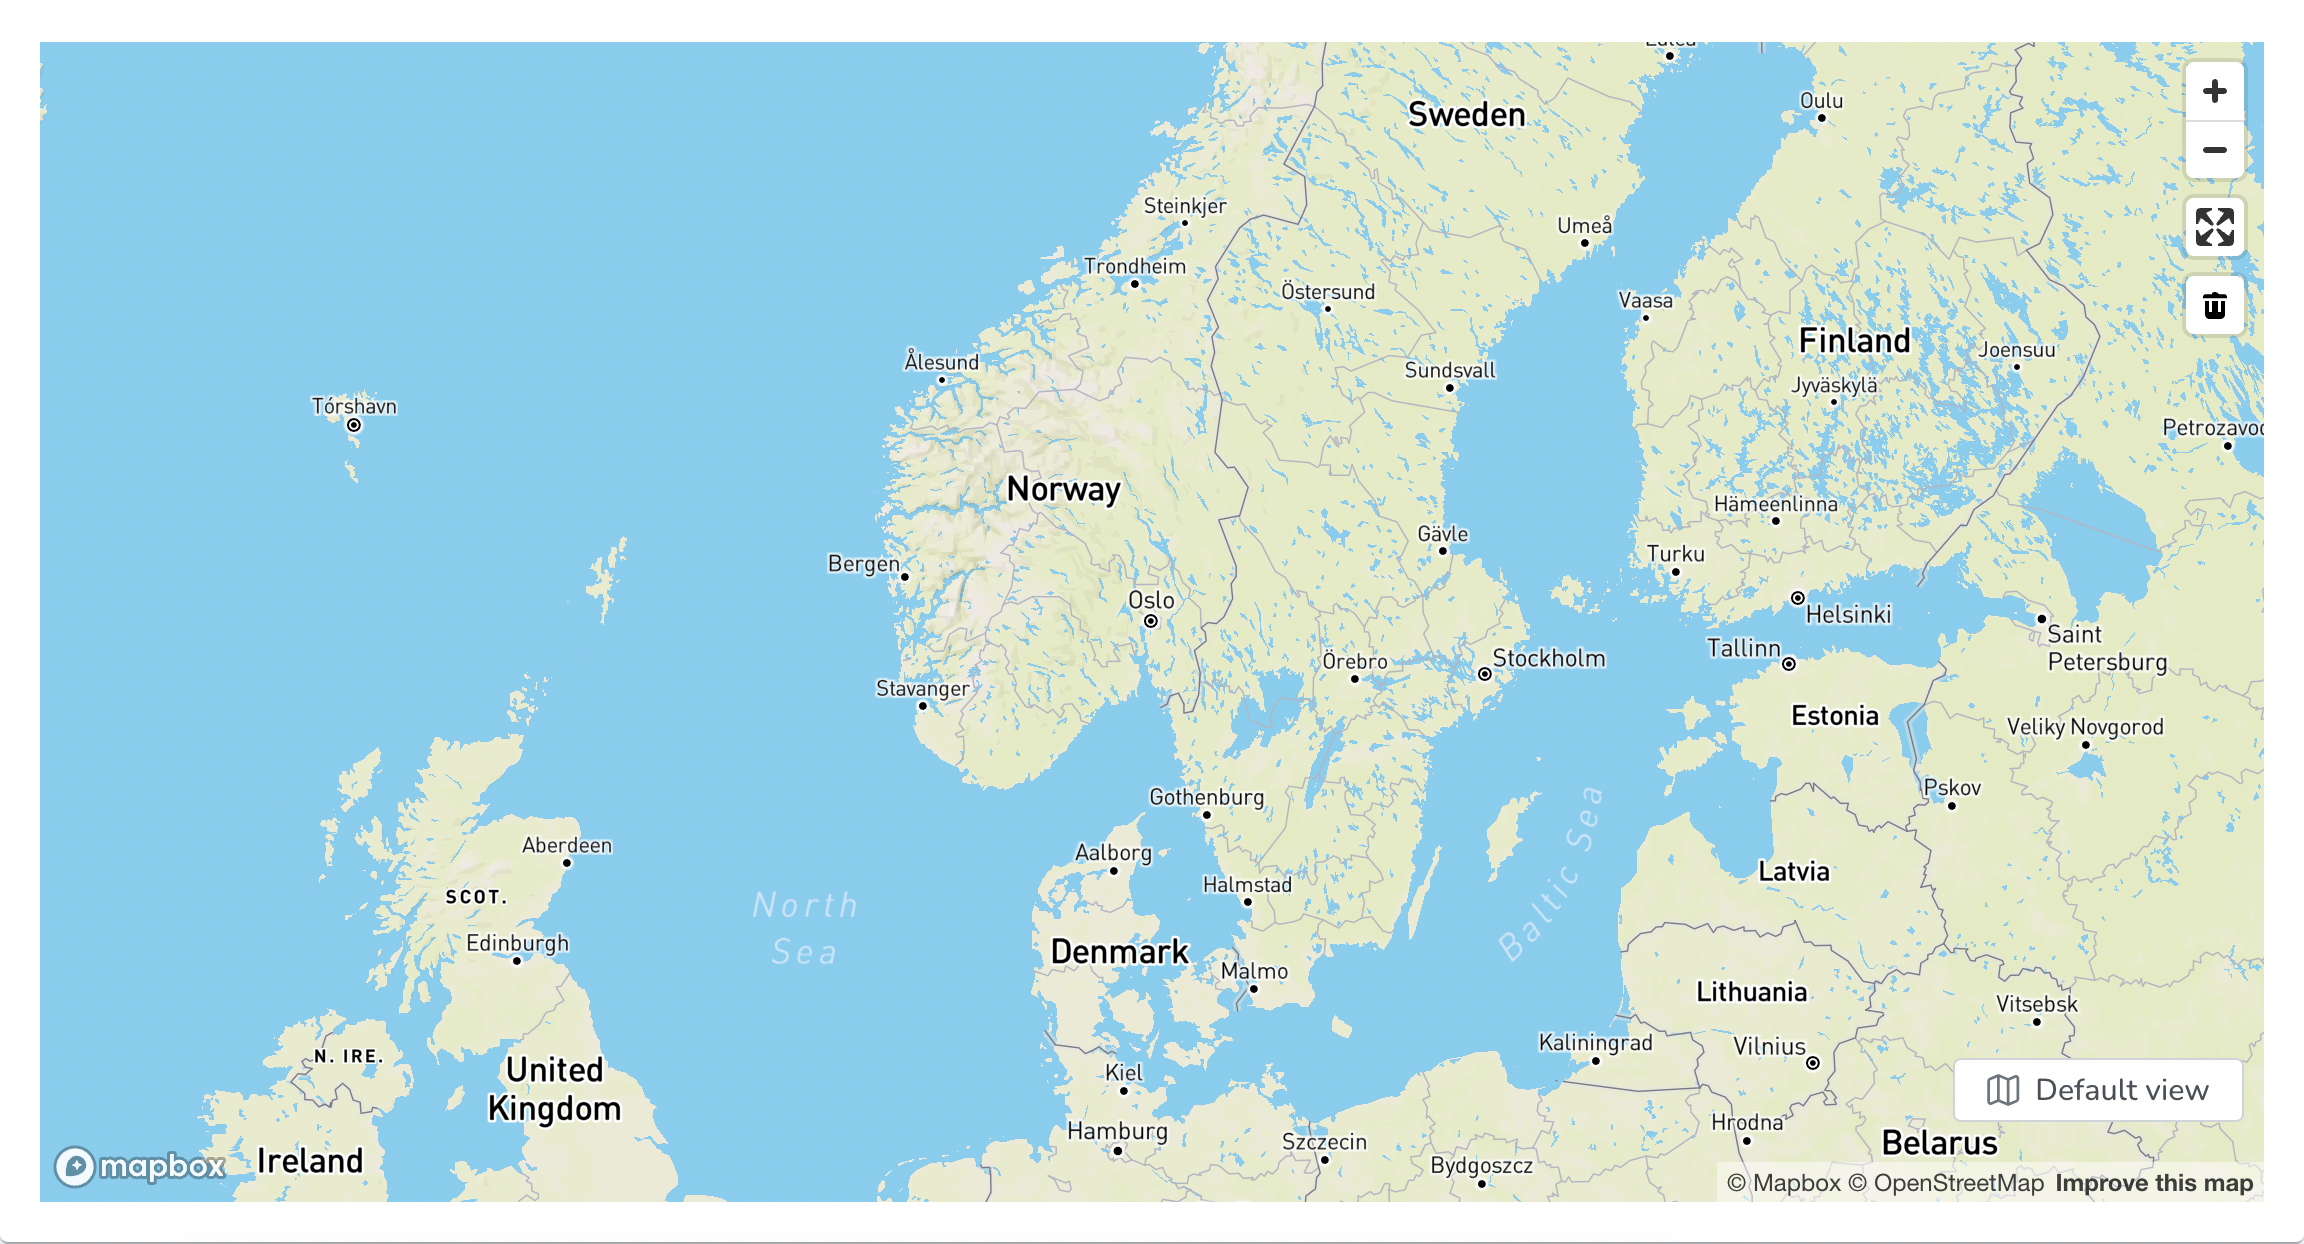
Users can utilise various tools available on the map interface:
- The "Zoom In" and "Zoom Out" buttons allow users to adjust the map's scale to better view the desired location.
- The "Enter fullscreen" option expands the map to full screen mode
- The "Delete" button allows users to remove any drawn shapes or markers from the map.
- Finally, the "Default view" button resets the map to its original view, allowing users to start fresh when making new location edits.
¶ POINTS
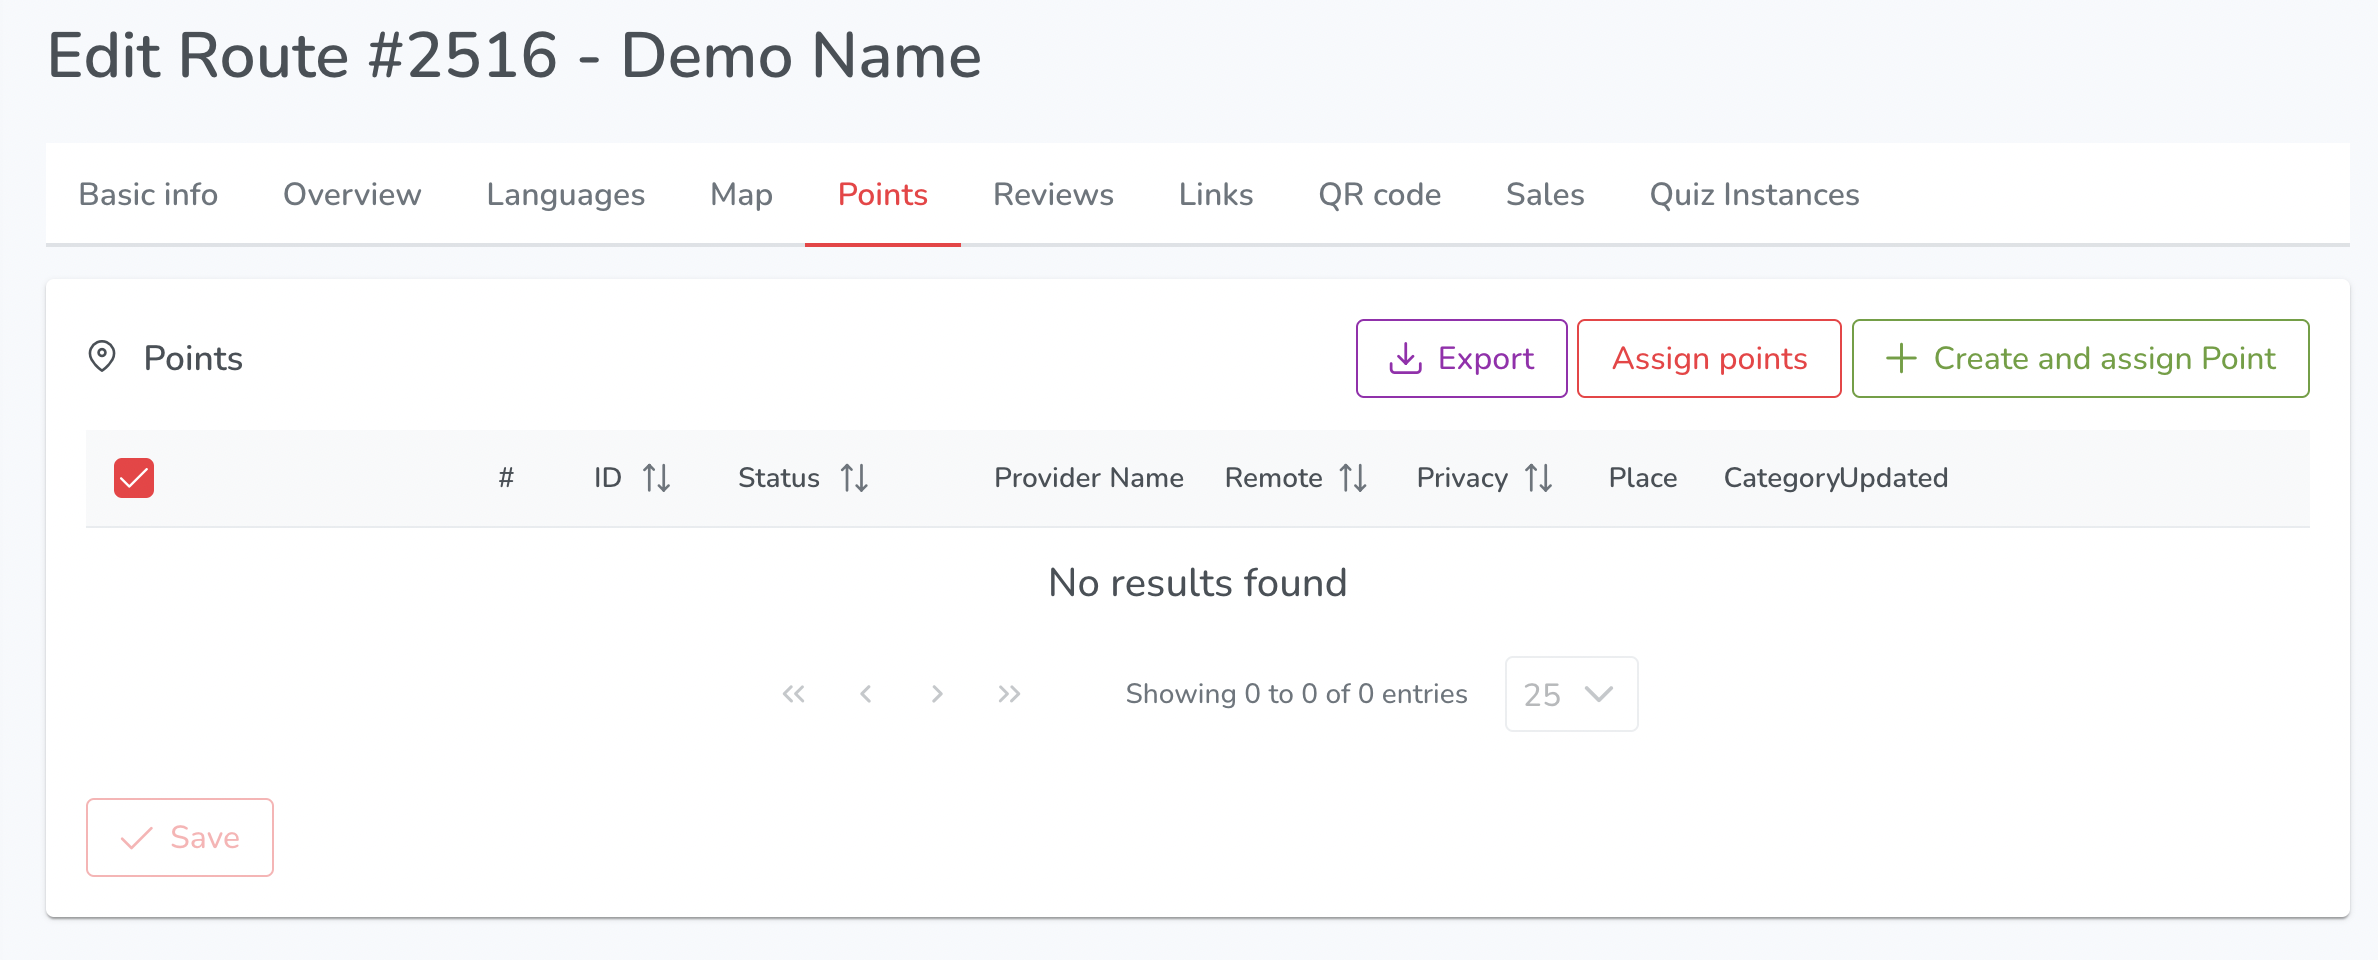

When editing a route, users can manage the points that belong to it in the "Points" section, which includes the following options:
- Export: Users can export the points list.
- Assign points: Users can assign existing points to the current route.
- Create and assign Point: Users can create a new point and assign it to the current route.
- Save: Users can save changes made to the points list.
¶ REVIEWS

Users have access to a reviews section, where they can view and manage reviews submitted by customers for their content.
¶ LINKS and QR CODE
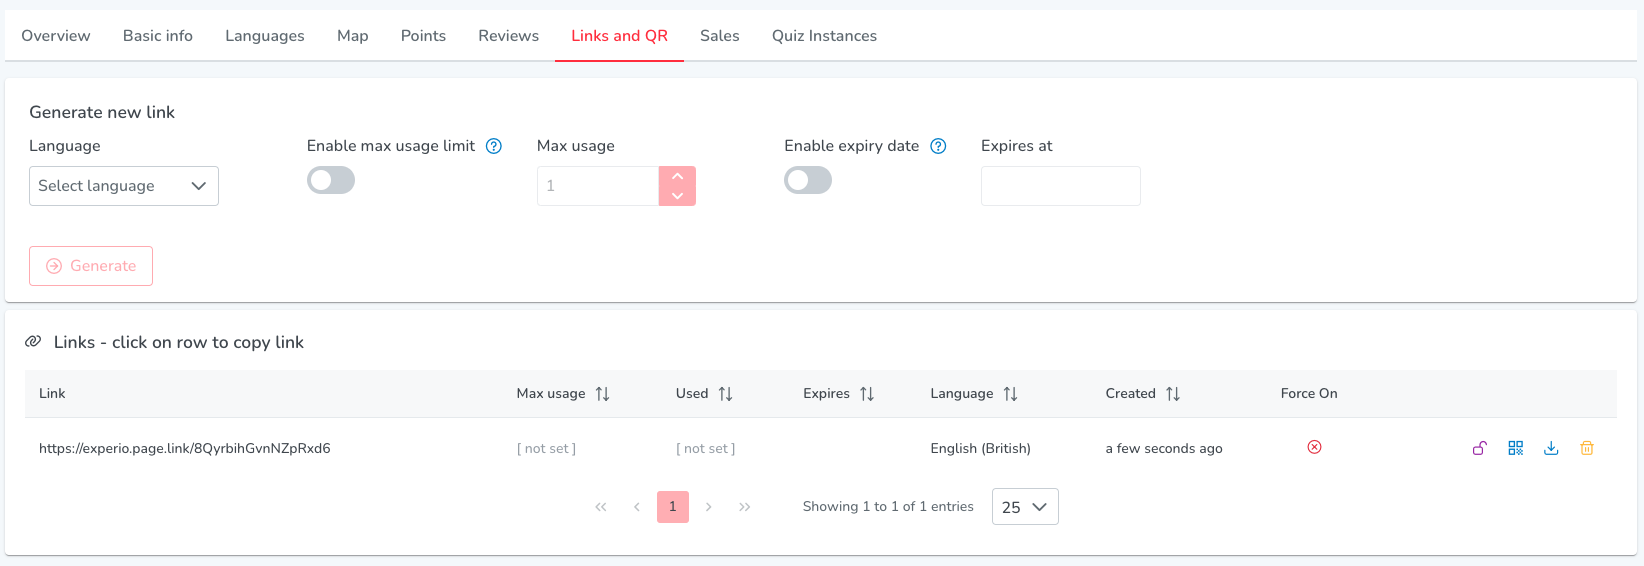
The Links section provides options for creating and managing links to Voice of Norway content:
- Language: Users can select the language for the link.
- Enable max usage limit: Users can set a limit for the number of times the link can be accessed.
- Enable expiry date: Users can set an expiration date for the link.
- Generate: Users can generate the link and copy it to the clipboard for sharing. By generating link, it also generates associated QR code.
Enabling Max Usage and/or Expiry Date makes your Route hidden in mobile app.
When a link is created, the platform displays the following columns:
- Link: The generated link for accessing the content.
- Max Usage: The maximum number of times the link can be used.
- Used: The number of times the link has been used.
- Expires: The expiration date of the link.
- Language: The language associated with the link.
- Created: The date and time when the link was created.
- Force On: An indicator/button to override all expiry settings for the link.
In addition, users are presented with the following indicators/buttons for each link:
- Clicking on table row: Copies the link to the clipboard.
- Force On Button: Allows users to override all expiry settings for the link.
- Preview QR Code Image Button: Renders the QR code image associated with the link and provide download.
- Download QR Code Image Button: Downloads the QR code image associated with the link.
- Delete Button: Deletes the link from the platform.
¶ SALES
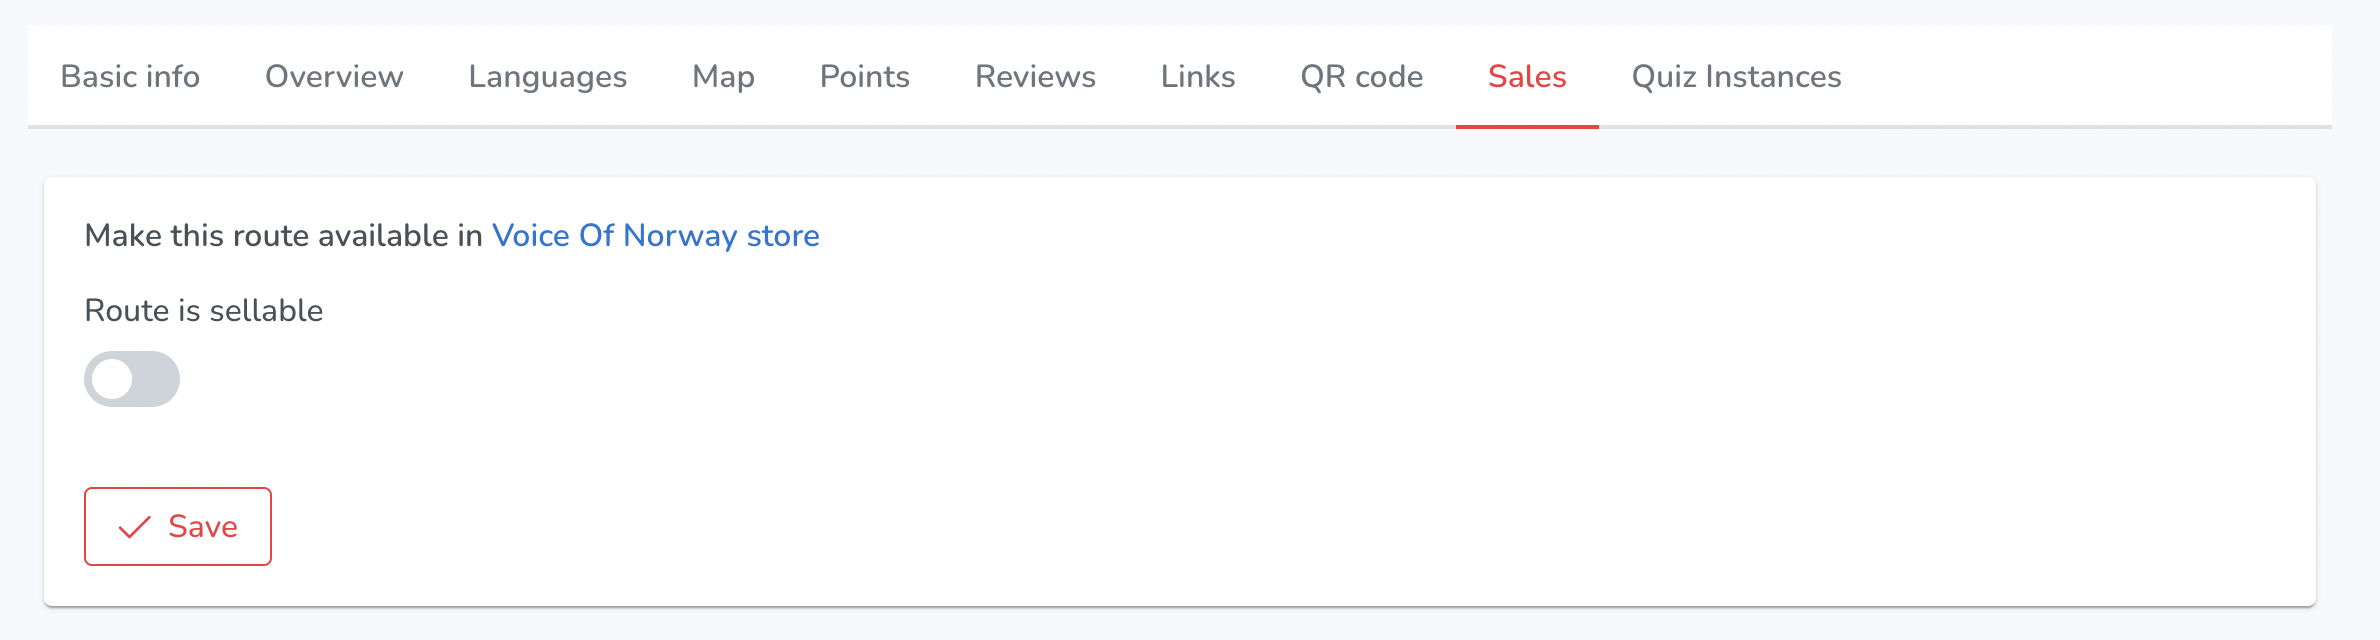
Under the sales tab, users can enable the "sellable" toggle for a route, indicating that the route is available for purchase. They can then save their changes. Additionally, a link is provided to the Voice of Norway store where customers can purchase the route.
¶ QUIZ INSTANCES
In the Routes section of the platform, there is a Quiz Instances section that provides various information about quiz instances for each route. It includes the total number of instances, categorized by whether or not there was any interaction and whether or not it was completed. The breakdown of interactions includes instances that were created but not answered, as well as those that were both created and answered. The breakdown by correctness shows the number of correct and incorrect answers for each instance. Additionally, there is a list of results that includes the instance ID, user ID, active status, creation and update time, and end time. By clicking on a row, users can view more detailed information about a specific quiz instance.